The Multi-Stage Pipeline
The multi-stage pipeline serves as the interface between the dataset class and the model/trainer (discussed in The Trainer). It defines how to combine individual samples from the dataset into batches that are fed to the model. Each batch contains the model inputs for the forward pass and the corresponding targets needed to compute the loss.
The multi-stage pipeline has three sequential stages:
Sample processor pipeline: Sample processors act on individual data samples (i.e., data points).
Collation: The collator pipeline collates individual samples into a batch.
Batch processor pipeline: Batch processors act on the entire batch.
This sequential processing gives the multi-stage pipeline its name. In this project, most of the computation occurs during the sample processing stage.
A basic implementation of a custom MultiStagePipeline looks
like this:
from noether.data.pipeline import MultiStagePipeline

class CustomMultiStagePipeline(MultiStagePipeline):
    def __init__(self, **kwargs):
        super().__init__(
            preprocessors=[],
            collators=[],
            postprocessors=[],
            **kwargs,
        )
You need to provide three lists to the multi-stage pipeline (which are all empty in the example
above): one for sample processors, one for collators, and one for batch processors. The
MultiStagePipeline iterates through each list sequentially. The output from one processor
becomes the input for the next, making the order of operations crucial for all three stages.
For a guide on writing multi-stage pipelines, see How to Implement a Custom Multistage Pipeline.
Sample processors
To understand the
AeroMultistagePipeline (in pipeline/multistage_pipelines/aero_multistage.py),
it’s essential to understand the data processing flow for this project.
We’re dealing with CFD aerodynamic simulations that have both a surface and a volume mesh/field.
Each point in these fields has three coordinates (x, y, z), one or more target values (e.g.,
pressure, velocity, vorticity, wallshear stress, etc.), and potentially
additional features (e.g., SDF, surface/volume normals). The target values and features can
vary depending on whether the point belongs to the surface or volume and which dataset is used.
From now on, we’ll refer to these additional features as physics features. We do not
consider global features for this project.
The data structure for our tasks is defined in, for example,
configs/data_specs/shapenet_car.yaml,
which corresponds to the ModelDataSpecs schema.
The models we use can be roughly divided into two classes:
Point-based models, where the input points to the model’s encoder are also the points used for predicting the output values (e.g.,
Transformer,Transolver).Query-based models, which use additional query points (distinct from the input points) for predicting output values (e.g.,
UPT,AB-UPT).
This means we have to build a multi-stage pipeline that works for both point-based and query-based models.
We will now outline the sample processor pipeline required for these models:
Some input tensors have constant values. For example, the
SDFfor the surface mesh is always zero. Therefore, we first create default tensors if needed. Because this step occurs before batch collation, it’s considered a sample processing step.Next, we subsample the entire simulation mesh to a specified number of surface and volume points and, if used, query points. For both input and query points, we define how many to sample from the surface and how many from the volume. If we train AB-UPT, we sample anchor points instead of input/query points.
If we use query points, their corresponding physical quantities become the model’s prediction targets. If we only use input points, their values are the output targets (labels). Hence, we need to rename the relevant values to
targetsbased on whether the model uses input points or query points for its predictions.
The high-level pipeline is visualized in the image below:
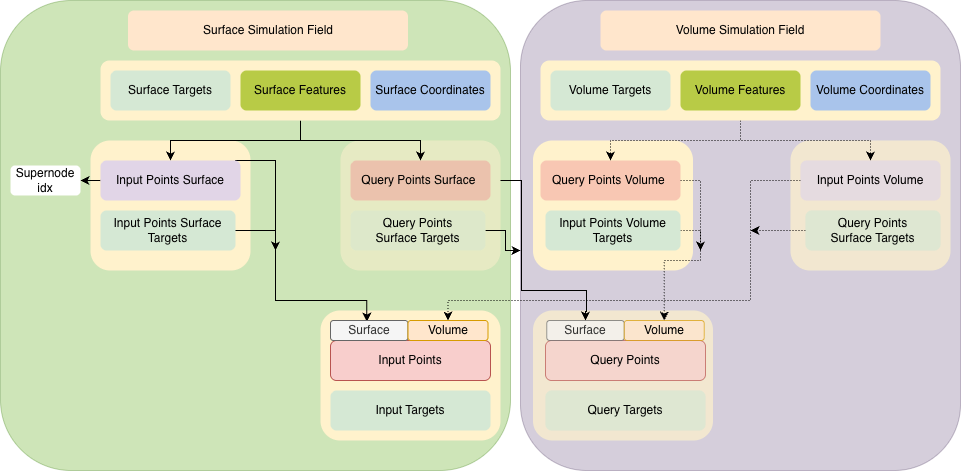
Pipeline data flow for the ShapeNet-Car models.
This entire pipeline is implemented in the _build_sample_processor_pipeline method in the
AeroMultistagePipeline class, which composes the list of sample processor classes based on
the three steps listed above. This method returns a list of individual
SampleProcessor instances. Each sample processor takes a sample as input (which is a dictionary with the result
of all the getitem_* methods called by the dataset for one data point) and does some form
of processing on one or more tensors of the sample. Note that the order is important, as the
sample processors are called sequentially.
When the multi-stage pipeline runs, the sample processors are called as follows:
# pre-process on a sample level
samples = [deepcopy(sample) for sample in samples]  # copy to avoid changing method input
for sample_processor in self.sample_processors:
    for idx, sample in enumerate(samples):
        samples[idx] = sample_processor(sample)
Each sample processor takes a sample as input and returns the (pre)processed sample.
Each SampleProcessor must implement the
__call__(self, sample: dict[str, Any]) -> dict[str, Any] method. This method receives a
dictionary containing the sample’s tensors as input. The SampleProcessor’s goal is to apply
a specific processing step to the corresponding values for one or more keys in the sample
dictionary.
For a guide on writing sample processors, see How to Implement a Custom Sample Processor.
Collators
The code for calling the collators in the multi-stage pipeline looks as follows:
# create batch out of the samples
batch = {}
for batch_collator in self.collators:
    sub_batch = batch_collator(samples)
    # make sure that there is no overlap between collators
    for key, value in sub_batch.items():
        if key in batch:
            raise ValueError(f"Key '{key}' already exists in batch. Collators must not overlap in keys.")
        batch[key] = value
Each collator defines how to merge certain keys from each sample into a batch. In most cases,
the DefaultCollator, where tensors are simply
concatenated along the batch dimension, will suffice. However, when creating sparse tensors, for example, a more sophisticated collation
approach is required. We define the collator pipeline in the _build_collator_pipeline method.
Only when dealing with supernodes do we require additional collator classes such as the
SparseTensorOffsetCollator (e.g., for AB-UPT and
UPT).
Batch processors
In this project, we do not use any batch processors. Nevertheless, they work in the same way as sample processors. However, instead of processing individual samples, they process the collated batch. Below is the code showing how batch processors are called:
# process the batch
for batch_processor in self.batch_processors:
    batch = batch_processor(batch)

return batch